
How To Make An Epoxy Resin River Table
Create your own epoxy resin river table
We have put together this complete step by step guide to creating your very own epoxy resin river table. From prepping your wood to pouring the epoxy, learn how to create a bespoke and decorative table.
Watch the video and follow our steps below to learn how to make your epoxy resin table today.
Why create an epoxy resin river table?
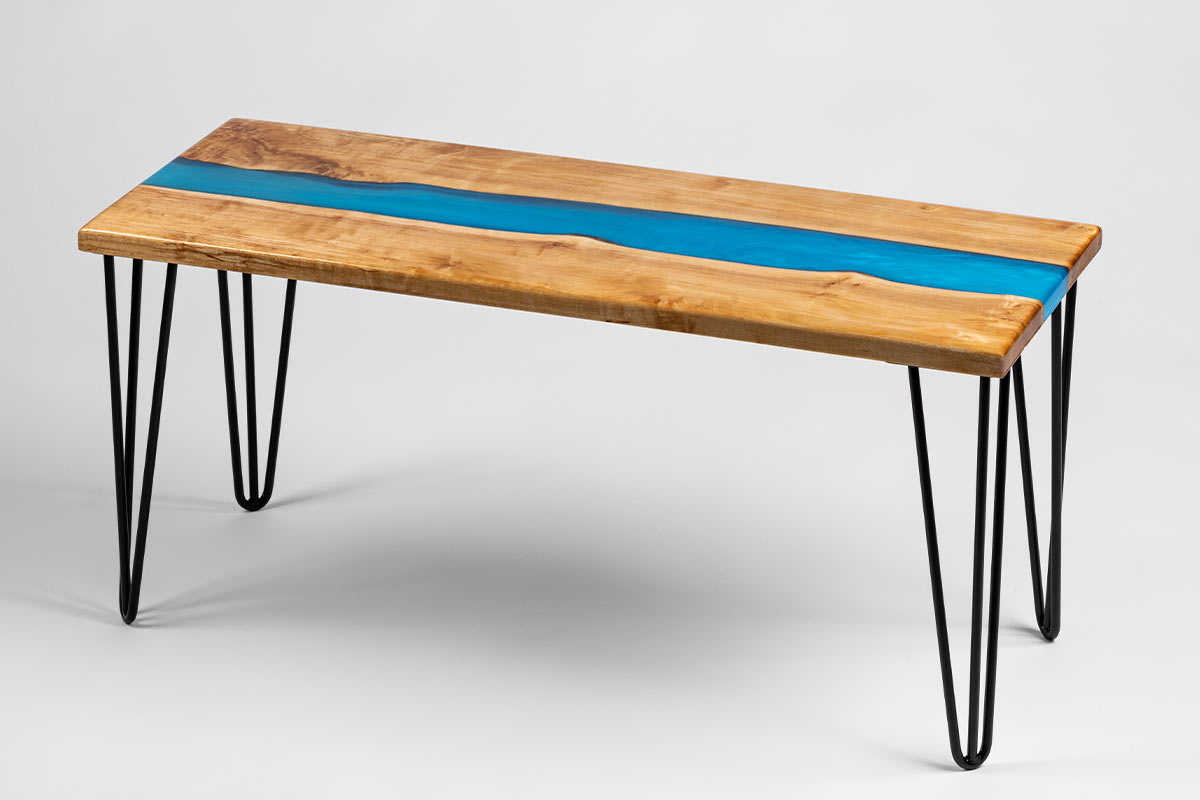
Resin river tables are beautiful pieces of furniture which can be tailored to suit your design and taste. First originating in the US, they are now a popular trend worldwide. By combining clear casting resin with live edge timbers, you are able to create a beautiful, unique piece of furniture. They're functional, creative and look great in rustic or modern environments. You can let your imagination run wild when designing your river tabletop. From clear, classic table designs to eccentric pieces with a striking combination of colours, the possibilities are endless!
Plus, the limitations don't stop with river tables. This technique can also be used to create a variety of other furniture pieces. The simple yet effective process of combining wood and epoxy resin allows you to create stunning effects; including tables of any size or shape, chopping boards, chairs and more.
Select and prepare your timber
Select your timber and cut it to your desired tabletop length. We've opted for birch wood. Rip your timber to width and then skin top or surface plane the timber edge to prepare the surface for the thicknesser.
Plane your timber to your required thickness, making sure both pieces of timber are the same.
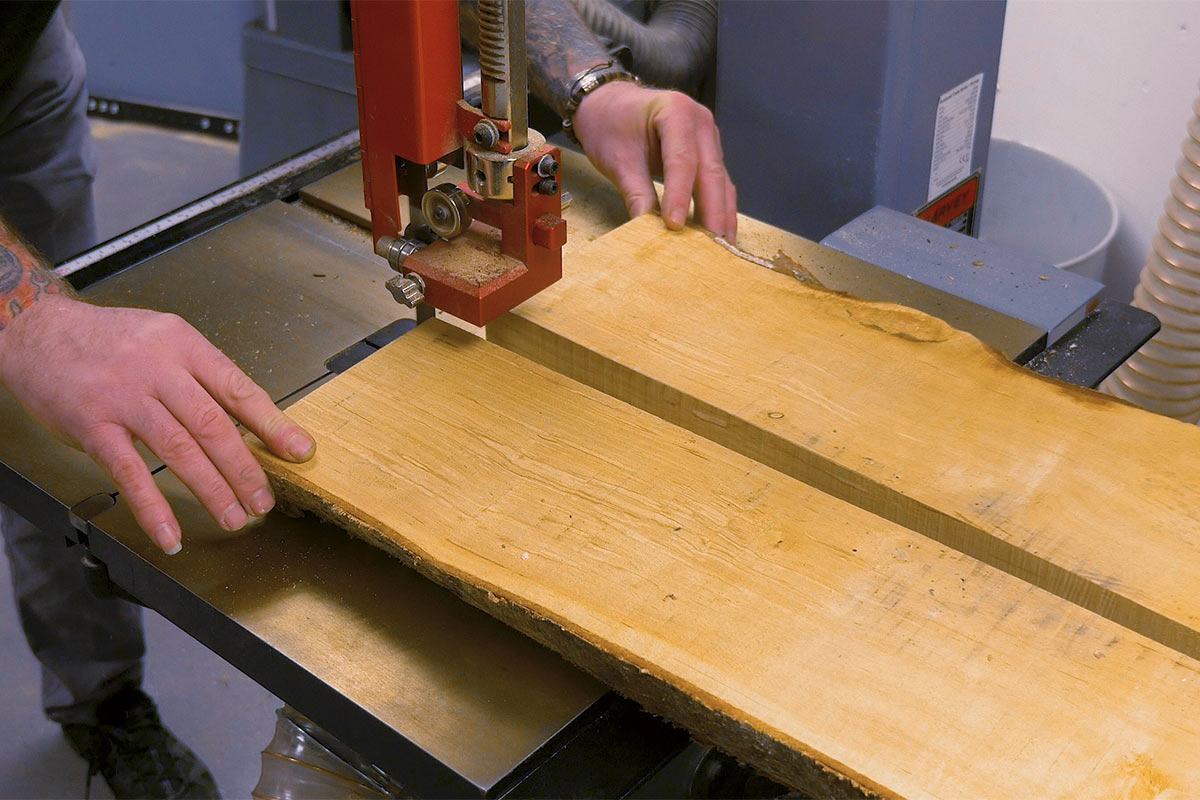
Next, debark the edges of your timber using a wire brush and drawknife.
Preparing the mould for your tabletop
Cut the material to size for your mould. We're using MDF chipboard. Don't forget to leave the desired space in between the boards for the epoxy resin.
Line and seal the mould with a waterproof tape to prevent any epoxy resin from leaking later on.


Next, assemble the mould. Then, use silicone or clamps to fix the tabletop timber boards to the bottom of your mould.
Prepare your resin


Calculate the volume of the first part of your casting resin for the main pour. Pour into a mixing pot and mix thoroughly using a paddle.
Measure the second part of your casting resin to your mixture and mix thoroughly. If desired, add a metallic pigment and mix thoroughly.
Get ready for the pour


Once you've ensured your bench and tabletop is level, you can begin to pour your resin between your timber boards. Wait a few minutes for bubbles to rise. Then use a heat gun to burst the bubbles. Leave the resin to set (roughly 5-10 days) before removing the mould.
Once out of the mould, remove any rough edges then clean and sand the tabletop surface using a random orbit sander to a 320 grit.
Use a router and cutter to achieve a round over edge if desired and resand.
It's all about the finish


For a crystal-clear, durable finish that resists yellowing, fading and cracking over time, we recommend adding UV Poxy Coating Resin as a final coat. Measure and mix the coating resin thoroughly and transfer to a second mixing pot. Top Tip: Make sure not to wipe any excess from the side of the original pot
Pour the coating resin over your tabletop and spread the surface evenly using a squeegee. Leave to set for 3-4 days.
Give your table some legs


Fix your chosen legs to the bottom of your table. Be sure to take care when drilling your pilot holes and choosing the screw length, to ensure you don’t drill through the tabletop.
Once you've fitted your legs, your table is complete! All that's left to do is to add it to your home as a practical or stylish addition to your furnishings.
Show us your creations
We hope that you've enjoyed learning how to create a beautiful, unique epoxy resin river table. If you've made your own river table, or you've used epoxy resin for other great creations, we'd love to see them. Either comment below or send us a photograph. Alternatively, get in touch via our social media platforms. Find us on Facebook or Instagram and tag @axminstertools.


Great guide,
(until the end... Step 22 "Be sure not to take care when drilling your pilot holes" LOL. Been here, done that!)
I will give it a go, i have some beech slabs from an old tree in my garden that I will try with this. My son is hopefully emigrating to NZ Covid and Visa permitting,, so I will give it to him before he leaves, A little piece of England..
thanks for the guide
Hi Eric, thanks for your comment. Yes, Step 22 is a mistake I'm sure a few of us have made! Good luck with your project if you haven't already made it. We would love to see some photos of the finished piece!
Been making these for a couple of years now. Some by using some of the excellent timber purchased from your North Shields store. I can be found on Instagram @toms_wooddities !
Great stuff, thanks Tom. We'll be sure to take a look at your page!
Just wondering about the strength of the table as it relies on the edge bond between the resin and the wood with no other mechanical structural reinforcement. I know resin is tenacious stuff but is it enough? I’m looking at a large dining table and if our dinner ends up in a pile on the floor my wife won’t be happy...?
Hello Tim, thank you for your question. We are not able to guarantee the exact structural strength of Ecopoxy resin, however, one of the reasons users will opt for Ecopoxy is because of its strength. If you have a look online at some examples of Ecopoxy River Tables, you will see some large tables which have been made using the resin. I hope this helps!
You can drill pilot holes into the waney edges of your wood before the pours and as you pour the resin these fill up acting as ‘resin dowels’ to strengthen the build
Good suggestion.....
I love this video! I make Christmas Ornaments on my Scroll Saw and would love to use resin to fill in the cuts to make a stain glass window effect. Have you any tips for this idea?
Hi Sue, thanks for your comment! Sorry for the delay in getting back to you. I've been in contact with Colwin in our Skill Centre, who hasn't tried this before but he likes the idea! His top tip would be to make a false bottom which could be sanded off to reveal the resin, each void would need to be sealed and made watertight before pouring any resin. I hope this helps, please send us any pictures you have of your finished projects! Thanks.
Posted one of these in the march? Competition but no feedback. Have finally made it to the sawmill today to make the apron, legs & drawer. Also use clear casting resin from Swindon Composite Supplies, best finish. Will add a photo when complete.?
Great stuff, thanks Mark. Look forward to seeing the photos!
Hi,
Nice design, but i would strongly recommend using threaded inserts to attach the legs to the table. They are much stronger and are really cheap. You can buy them pretty much anywhere. Add a small dab of glue to the insert when you put them in with a Hex key and you will get a stronger bond that will last forever....
Epoxy is very strong......will never break....
Consider using Osmo if you want an nice natural wood finish instead of Epoxy gloss....
Where is the best place to buy the resins from.