Turned Plant Stand | Spindle Turning
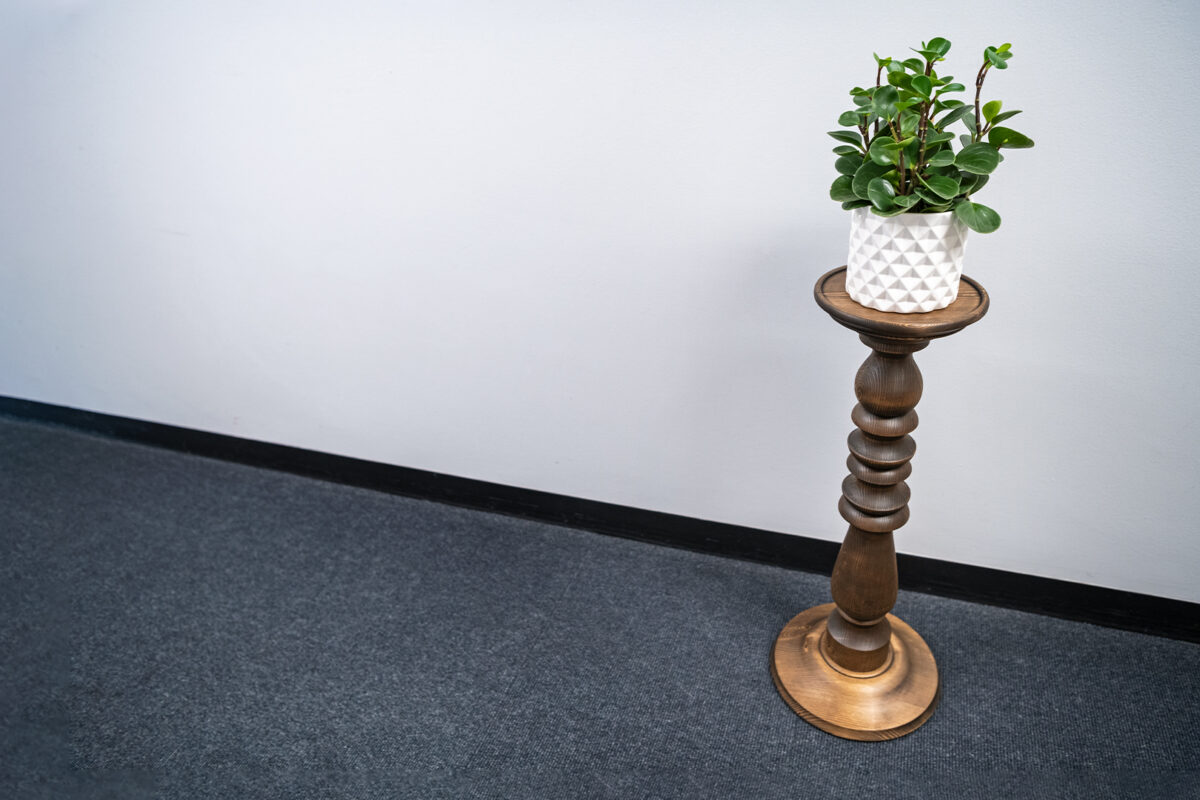
A larger turning project to get your teeth into, this turned plant stand project is a great way to apply your spindle skills on a bigger project.
The basic spindle skills still apply, just with this project they will be on a much larger scale. So if you are ready to take your spindle turning to the next level, have a go at this. Your plant stand can be as big or as long as you like. For our stand we have glued our timber together, and is made in three pieces.
Watch Colwin in our Woodworking Wisdom demo, or follow our step by step guide below.
Prepare the centre spindle
Begin by cutting the timber to length and then rip to width.

Surface plane one face on each piece and glue the surface to be jointed together. Clamp and leave to dry for 24 hours.


Prepare and cut the base and top
Measure enough timber to cut out both base and top disc and then surface plane one surface, one edge and cut to width.

If you need to widen the base material, cut and add at this stage, then glue and clamp before leaving to dry overnight for 24 hours.

Once any glue has dried scribe the diameter of your discs in preparation to cut. Ours was 300mm in diameter. Then, cut out the base and top on the bandsaw before drilling both blanks with 40mm forstner bit.


Turn the base
Mount the base section on to the lathe by using a set of jaws to expand into the 40mm hole then clean off the outside edge and face in preparation to shape.

The base and top will be held with a dovetail recess. Measure and scribe the diameter of your chosen dovetail jaw and then, using, first a parting tool, then a bowl gouge, create the recess.


Sand to a good finish. Next, turn the piece over, hold on your dovetail jaws, then mark a platform to remain flat to except the centre column. Then, shape the base, making sure you leave some weight in it to support the stand. Finally, sand the base to a good finish.


Turn the centre spindle
Moving onto the centre spindle, tap in a large four prong drive to support your piece while turning. Having cut your centre spindle blank to size, and removed the corners to save time, rough down to a cylinder.

Next, measure and cut in a 40mm tenon on both ends of your centre column, then start turning to shape, not forgetting to size the joining faces where they meet the top and bottom. Sand to a good finish.


Turn the top
Once again, hold by expanding your chuck jaws into the 40mm hole pre drilled in your blank and create a dovetailed recess. Reverse the blank onto your dovetail jaws and shape the underside of the top. Then sand to a good finish.

Reverse back into your 40mm jaws to finish shaping the top of the plant stand, then clean the surface and ensure its flat.


Sand to a good finish and then test assemble the pieces together. Once happy, glue together for the final assemble. Once dry you can apply your chosen finish. We used a water based wood stain for a slightly lighter colour once wiped off.


Made it? Share it!
If you have made any of our projects we would love to see them. Share your photos with us on social media. Search and tag @axminstertools on Facebook and Instagram. Or upload to our online gallery.