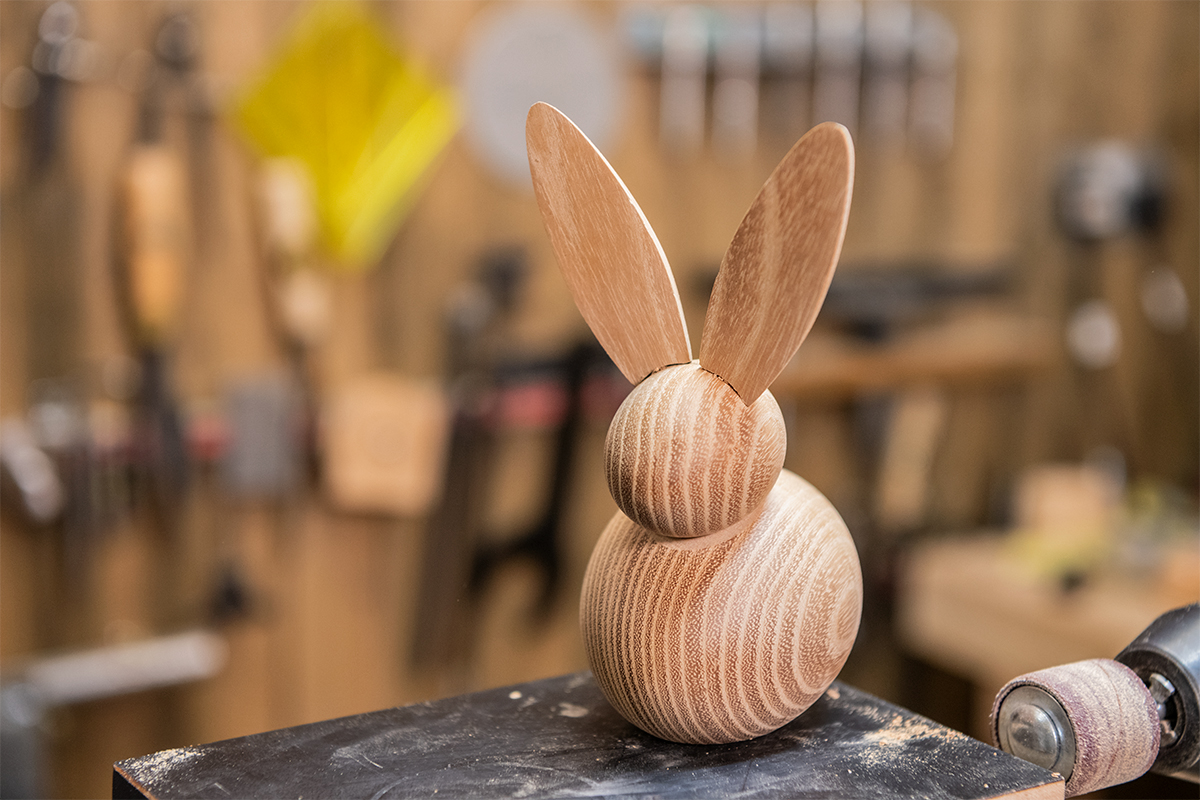
How to Turn a Wooden Bunny
What you'll need
This wooden bunny is a fun and quick turning project that will use up a few of those odd offcuts left lying around your workshop. A simple spindle work project, using basic tools, these charming rabbits can be made from any material you have to hand.
These are fun to turn and before you know it they'll be spreading across your workshop. A unique piece for your craft fair table or online marketplace, you can sell them as a paperweight with a difference, or scale up your sizes to make bunny doorstop. Or simply make to add a bit of fun to your Easter celebrations.
To make our wooden bunny we used to following blank sizes: Body: 90mm long x 70mm square; Head: 50 long x 30 mm square; Ears: 80mm long x 20mm square.
Watch Jason in our Woodworking Wisdom demonstration, or follow our step by step guide below.
Turn the body and head
The main body section is turned mounted between a set of ring centres. Rough down your blank to a straight cylinder using a spindle roughening gouge. Then, using a bowl or spindle gouge, shape this to an egg shape. Most turners can control a gouge better working left to right, from headstock to tailstock. One of the main advantages of using the ring centres is that the work can be reversed in orientation between the centres as these line up perfectly, which makes the task easier. With the shaping done these can be sanded through grits 150-400.


Repeat the process for the head section. This is turned in the same way as the body and turned to an egg shape.
Make a jam chuck
To clean up the ends, make two wooden jam chucks. In this case this is a hollowed wooden tube that has a tapered internal section. Use the tailstock to help align the egg shape, this is gently pushed into the hollow tube. Then using a gouge, clean up the stubs left from the drive centres.
Repeat this for both body and head.


Make the ears
To make the ears, the timber needs to be a square blank. This is mounted between the ring centres and using a skew cleaned down to a cylinder, but leave a 6mm length on both ends square. Create the ear shape in between the square end using the skew. Then sand to a finish


Next, cut the ears. Section into two parts using a bandsaw. Use a piece of MDF/Plywood under this to add support. A batten off the fence allows the guides to be bought lower, and a L shaped piece of Plywood/MDF creates a push block. Align the fence/batten so that the blade cuts on centre. The square section makes it stable. Cut in half down the length and then trim the end sections.


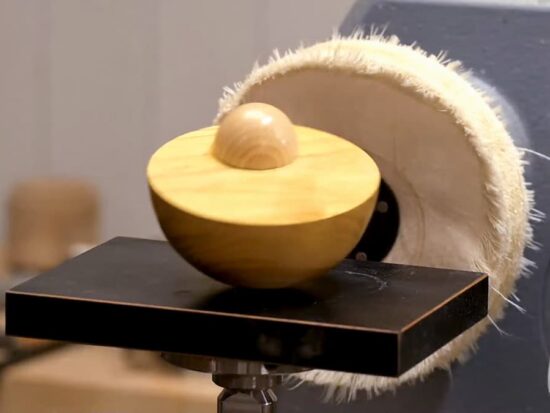
Use a lathe mounted disc sander to create the flats on the underside of the head, the top and under side of the body, and the flats of the ears. Run this at a slow speed, max 500rpm (this is safer for fingertips)


Attach the ears
Secure the ears with a wooden 3mm dowel pin. A hole in the base of the ear is drilled on a drilling table, on the lathe, using a 3mm lip and spur drill. The same drill is used to drill the two location holes in the head.


To match the curve on the underside of the ears to the curve of the head use a drum sander to create a small hollow, checking this against the head. Then cut the dowel to fit into the hole and insert the ears into the head.


Assemble your wooden bunny
Check how the bunny comes together and then apply a coat of sealer. Leave the flat sections where the head and body come together unsealed, as this will glue better. Use a buffing wheel to provide a hard-wearing polish and then glue the wooden bunny together. Elastic bands can really help for this.


Made it? Share it!
If you have made this, or any of our projects, we would love to see them. Share your photos with us on social media. Search and tag @axminstertools on Facebook and Instagram. Or upload to our online gallery.