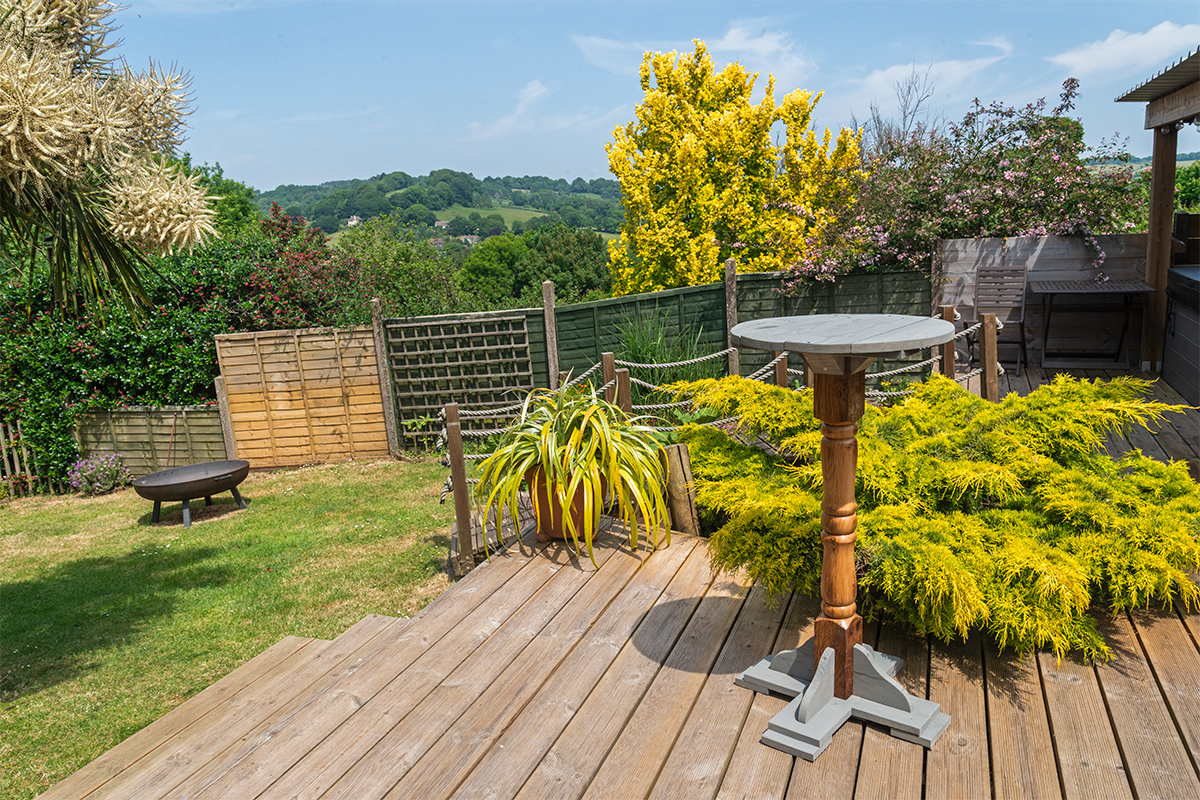
Using Recycled Materials | Make a Bar Table
What you'll need
Using recycled materials in your woodworking projects, is not only great for your pocket but for the planet too. Reusing timber where we can is a good practice to get into and will allow you to get creative!
In this project we show you how to turn an old fence post and a wooden pallet into a beautiful bar table.
Watch Colwin in these Woodworking Wisdom demos, or follow our step by step guide below.
Turn the centre stem
After dismantling a pallet to obtain the boards for the table feet and top, chop the fence post to length and mount between centres ready for turning.
Decide where you want the two pummels to be and mark them onto either end with a square and pencil.
Before roughing down, cut the pummels with a skew chisel. This will ensure the corners of the pummels do not split away when doing the main shaping.
The centre section can be roughed down to a cylinder ready for the design and shaping stage. We added a bead between the pummel and rest of the design so we need to deepen the V cuts between the pummel and round sections.


Once these stages are done, you have a blank canvas to work with and can add your features if you wish, or you may decide to keep this plain.
We added some shape and a couple of beads. Once shaping is finished, sand to a good finish including the square pummels.


Assemble the table top
Begin by prepping the pallet wood, cutting to your desired length with a chop saw.
All the boards are joined together by glue and then screwed. Once dry this will be cut to shape on the bandsaw.


Make the base
Start to assemble the base. Gather the base pieces together and begin by assembling the feet sections. These are in two sections with all contacting faces glued before screwing together as shown in the video.
Then add the curved feet supports. These are cut to shape on the bandsaw and positioned on the base section as shown in the video.
Complete the table top
Start the table top with a dry fit before screwing and gluing. Once happy, glue and screw together, the centre spacers are cut to the same dimension as the centre column and only one fixed to position at this stage.


Mark out the round of the table top using a large set of dividers or string and pencil. Then, take the assembly to the bandsaw and cut your circle.


Sand the top to a finish. We are painting ours, so here we sand to 180 grit. We are not too worried about gaps to get a rustic look, but adjust yours to suit your preferred tastes as necessary.


Sand and finish
Next, sand the base to the same finish before painting.
We have coated the centre column with oil, which finishes the oak really nicely.


In contrast, the base and top are going to be painted with some left over shed paint, which needs to be done before the final assembly.

Assemble the table
Start the assembly by positioning the centre column over the base. Then, screw on the corner braces from the underside, and the centre column resting on the floor.


Screw the side braces to the centre column and add extra-long screws through the base and into the centre column to give extra strength.


Slot together the table top and centre spindle then screw and glue in the fixing block. Finally add in the supports blocks that secure the top to the column.


Projects using recycled materials
For more project inspiration why not take a look at some of our other pallet wood projects - Create Pallet Wood Wall Art and Pallet Wood Projects.