Make a Sofa Tidy and Table | How To
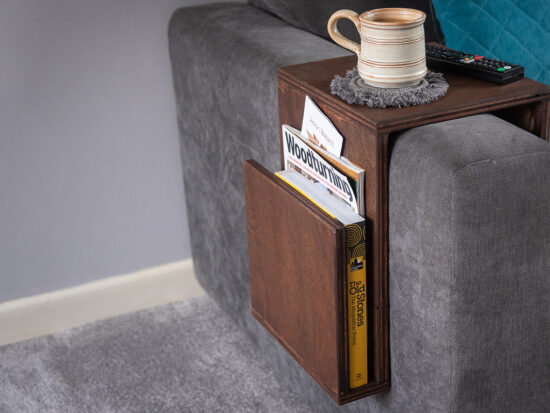
This article will guide you step by step to make a sofa table and tidy to keep your armrests clean of tea rings and keep you magazines within easy reach. A simple and quick home...

In this step by step guide, we will show you how to make a scaffold board table using simple tools and techniques, a great DIY project for the home and for testing out basic woodworking skills.
Reclaimed scaffold boards are a great source of timber and are usually pretty cheap too. Check you local reclamation yard to see what they have available. Repurposing scaffold boards is great for creating rustic furniture and decorative items for the home.
Watch our Woodworking Wisdom video or read our step by step guide below to find out how to make a scaffold board table from scratch.
Begin by roughly cutting your boards to size, leaving them slightly bigger for trimming later. Make sure all the boards are clean and free of nails, staples and debris by brushing them off with a wire brush. If you need to square your timber you can do this using a planer thicknesser or by hand. Sand the boards to your desired finish.
Edge the boards where they are to be jointed. For the joins we used a biscuit jointer to create a stronger join. Biscuit joint the boards in three places.
Finally, glue and clamp the boards together then leave for 24 hrs to dry. For more tips on how to glue table tops and panels read our panel gluing tips and techniques blog.
To finish, begin by sanding the table top to remove signs of residual glue and give a smooth finish.
Coat with Osmo top oil Satin or Matt and leave to dry, usually 24-36 hours.
Once your table top is dry, locate your hairpin legs into position. Drill a pilot hole and screw the legs into position to finish your table.
Have you made our scaffold board table? You might like to try making a sofa table and tidy or our bandsaw wine rack.
If you have made this project or any of our Woodworking Wisdom projects we would love to see them. Share with us your pictures on social media by searching and tagging @axminstertools on Facebook or Instagram.