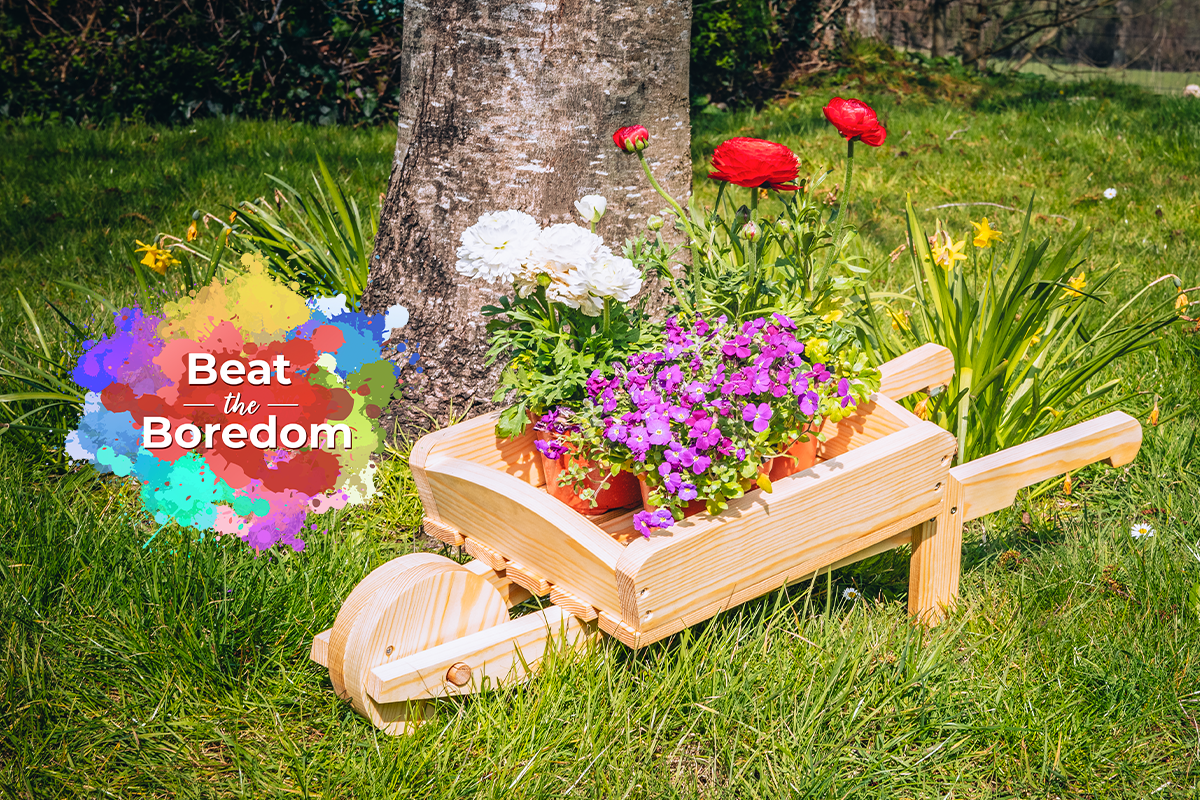
Mini Wheelbarrow Planter
Our Mini Wheelbarrow Planter is a great way to entertain the children over the long Easter break. Get creative and get outside!
Part 1 - Get organised
In our example, we used 15mm softwood. We chose untreated timber but it will be weatherproofed when complete.
Part 2 - Cut the timber
Here, we advise that you make some big cuts to make the timber easier to manage. The cuts can be done with a bandsaw, jigsaw or even hand saw depending on your tool kit.
Part 3 - Make the side handles
The first pieces to make are the side handles. These are the biggest parts of the barrow and hold everything else together. They have a radiused edge coming off the hand grip and a chamfered leading edge that fits over the front wheel.
Part 4 - Mark and cut
Mark out all the detail and start to cut each piece. Don't worry about the saw marks at this stage. These can be cleaned up when all the pieces are cut.
Here are the first two components cuts and ready to be cleaned!
Part 5 - Mark and cut other areas
Now start on the smaller pieces, side and end panels plus the five bottom slats. Then cut out the shapes either with a bandsaw, jigsaw or handsaw.
Part 6 - Refine
Once everything has been cut out you, can start any refinements to the shapes. These include radiused corners as shown on the two end panels.
Part 7 - Clean up edges
It's now time to clean up all the cut edges with a hand plane and spokeshave. Use this time to do some hand sanding to get to the finish you desire. However, you may just want to leave it rustic and choose not to lean any areas.
Part 8 - Drill holes
In preparation to assemble, you will next need to drill a series of holes. Follow the line drawing for positioning. A pillar drill is definitely the best tool for the job here. However, if you don't have one then a hand drill is a good alternative. After drilling the holes, give them all a pass with a counter sink. This isn't just there to make the job look tidy, it also parents joints from splitting.
Part 9 - Make the wheels
Making the two wheels next, start with a set of dividers or a compass and scribe your circle. Cut out using your bandsaw or jigsaw. Using the centre mark left between the dividers, drill through using a 15mm forstner bit.
Part 10 - Drill
Now position the side arms and mark the point to drill the corresponding hole. Once again this will be 15mm.
Part 11 - Assemble
Lie all of your components down on the bench. Double check that all the holes have been drilled. Start with the end and side panel, using the bench vice hole and end panel. Screw on the first side panel. Turn the piece around and add the other end panel before capping with the final side panel.
Position the bottom slats so they have an equal spacing, Next, start by fixing the middle and two outer pieces and secure the last two. Stainless steel screws need to be used as the mini wheelbarrow planter will be out in all weather conditions.
Next, to assemble the side handles you need to add the wheels. Start by sizing to length a piece of 14mm dowel by sliding it through the side pieces and the two wheels. Mark to length and cut.
Now assemble the two wheels by drilling and countersinking one of them then screwing together.
Drill and countersink the underside of the two side rails directly through to the 15 mm hole. This will secure the axle in position.
Lastly, to assemble the side handles and tray together, position them so the handles are central before you drill, countersink and screw together.
Part 12 - Make the stand
There's now only one last piece to make. The stand is a very simple piece to make as you can see. It consists of two identical parts with a 45 degree angle at one end. Once cut, drill and screw in position.
Part 13 - Finish
The last step is to choose a finish that will stand up to the weather conditions the Mini Wheelbarrow Planter will be exposed to. We chose to use one of the best - Osmo UV Protection Oil. For the ultimate protection, coat each piece before you assemble the last pieces. Then dry assemble and re coat. Your charming Mini Wheelbarrow Planter is now complete!
Win a £25 Gift Card…
For a chance of winning at £25 Axminster Gift Card, simply show us what Beat The Boredom projects you’ve completed by uploading them to Instagram, Facebook or on to our Community Forum.
Snap It
Take a photo of your project.
Tag It
Use the #BeatTheBoredom hashtag and upload it to one of the following;
Discover more…
If you’ve enjoyed reading this article, keep an eye out for our next woodworking project for kids as part of our online Beat The Boredom series. Watch this space for more details! Furthermore, why not take a look at all of our previous projects below?
Stuck at home with the kids? Looking for something fun to do? We have the answer with our online Beat the Boredom Series. A great way to get the children involved in a variety of...
Get connected!
Follow us on Instagram and Facebook to stay up to date on all the latest from our Beat the Boredom series. Connect with us using #BeatTheBoredom to @AxminsterTools.


Looks good, but where are the plans please?
great idea, is there a template or list of components to download?
Nice project and not a problem to me but less experienced woodworkers might benefit from a cutting list and drawing with measurements
love the wheelbarrow idea but there are no measurements to go by
Would love to see plans for this. I find it difficult without detailed plans
Could do with some measurements the sausage dog project has a drawing.