Turn a Tippe Top Wooden Toy | How to

What you'll need
A wooden toy is a classic gift to give to a loved one. Especially one that can be played with for hours on end and last a lifetime. And the wooden toys that are the most fun are spinning tops!
A spinning top is also a very basic woodturning project and is a great project for workshop offcuts. In this project guide we show you how to make a tippe top spinning wooden toy.
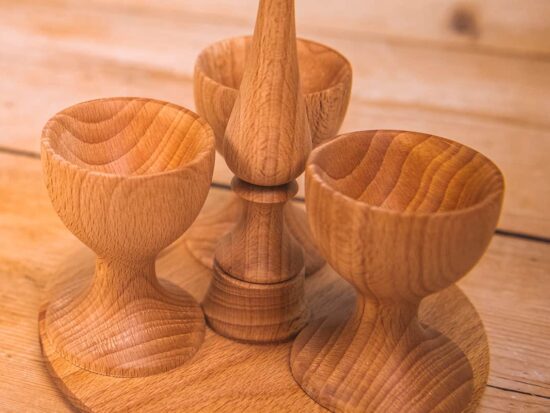
The tippe top design has been around since 1898, and was invented by Helene Spert. The base of the is spinning top is a sphere shape, with a hollowed section. Out of the hollowed section is a stem, which spins the toy. If made correctly, the tippe top, when spun, will invert itself, resulting in the sphere flipping and spinning on the narrow stem.
Watch Jason in this Woodworking Wisdom demo as he shows you how to make a spinning tippe top, or follow our step by step guide below.
Prepare your blank
Choose a non toxic timber, such as Ash or Sycamore which are are more child safe. The size of material will need to relate to the diameter of the sphere of the base of the tippe top. The spindle blank we have used is about 45mm square by 125mm long, which also allows for a reversal chuck to be made at the same time.
Begin by mounting the timber between the pro drive and revolving ring centre on the lathe. Set up the tool rest to just below centre height and rough the timber down to a clean cylinder. Set up the ring callipers to the jaws size of your chosen chuck jaws. On the tailstock end, cut a tenon to fit into the chuck jaws. Load the chuck onto the lathe and then mount the workpiece into the chuck. Bring the tailstock up to add support.


Begin separating the blank
On the tailstock end, mark up a section that is about 20mm long. Then, using a 10mm wide beading tool, reduce the diameter to about half the size of the blank.

Set up a ring calliper to the diameter of the ball section, (35-40mm diameter) reduce the diameter as required with the roughening gouge. Using the set callipers, mark out the length of the ball section, and draw a pencil line. Then, using a parting tool, cut on the waste side of the line, take two cuts side by side to reduce drag and burning. Aim to remove about half the diameter.


Create the ball section
Use a pencil to create a midway line to act as a guide, and use a spindle gouge to shape the ball section, cutting with the tip of the gouge to create the shape, working larger to smaller diameter. Refine the shape using a beading tool.


To make cutting the recess easier, use a few plug cutters and a drill chuck. Starting with the 20mm, mark up a depth stop point with masking tape. The depth needs to be to the halfway position within the ball held in a drill chuck in the tailstock. Use the spindle gouge to chamfer the end, which will help guide the plug cutter. Reduce the lathe speed to create less heat and more control, and drill to the depth.


Change the plug drills and repeat this task, ending up with a 10mm stem. To clean up this internal section, a 6mm beading tool can be used, taking light cuts.


Create the stem and part off
Clean up the end of the stem. It is important to check that the stem is in line with the ball section, and not too long in length, as this will affect how this will invert. Using the long point of a skew chisel, curve the end of the stem and soften the corner. A pointed end will not work for this. The outer sections can be sanded from 150-400 grit. With the sanding done, use a parting tool to part off the top, continuing the ball profile.


Create a jam chuck
The waste section that is in the chuck can be used to make a jam chuck to re-hold the tippe top. Use the skew to create a central guide point then drill a hole to match the diameter of the stem (10mm). Take this section out of the chuck and hold in a vice, then, using a hand saw, cut a straight groove down the length of this. Remount this into the chuck on the lathe and insert the tippe top holding on the stem. Refine and clean up the base of the ball and sand to a finish.


Remount this into the chuck on the lathe. Insert the tippe top holding on the stem, tighten the chuck jaws to close the wooden jam chuck then refine and clean up the base of the ball and sand to a finish.


Decorate to finish your wooden toy
Decoration can be added. We added a few burnt lines, using the point of a skew to create the 'v' and then burning with the Easywood Wire Burning Kit. The major aspect here is the smooth movement around the ball section, if texture is added this will create more resistance and affect how this will work.


You can now add a finish, however, a natural finish will be better for children to play with and more toy safe.
More wooden toy projects
If you have enjoyed making this tippe top wooden toy project, then why not try one of these wooden toy projects below.
Turned Spinning Tops with Colwin
Children's Wooden Toy Boats
How to Turn a Wooden Race Car Toy
If you have made any of these projects they we would love to see your pictures! Share your projects with us by searching and tagging @axminstertools on social media. Upload your images on Instagram or Facebook or upload to our online gallery.