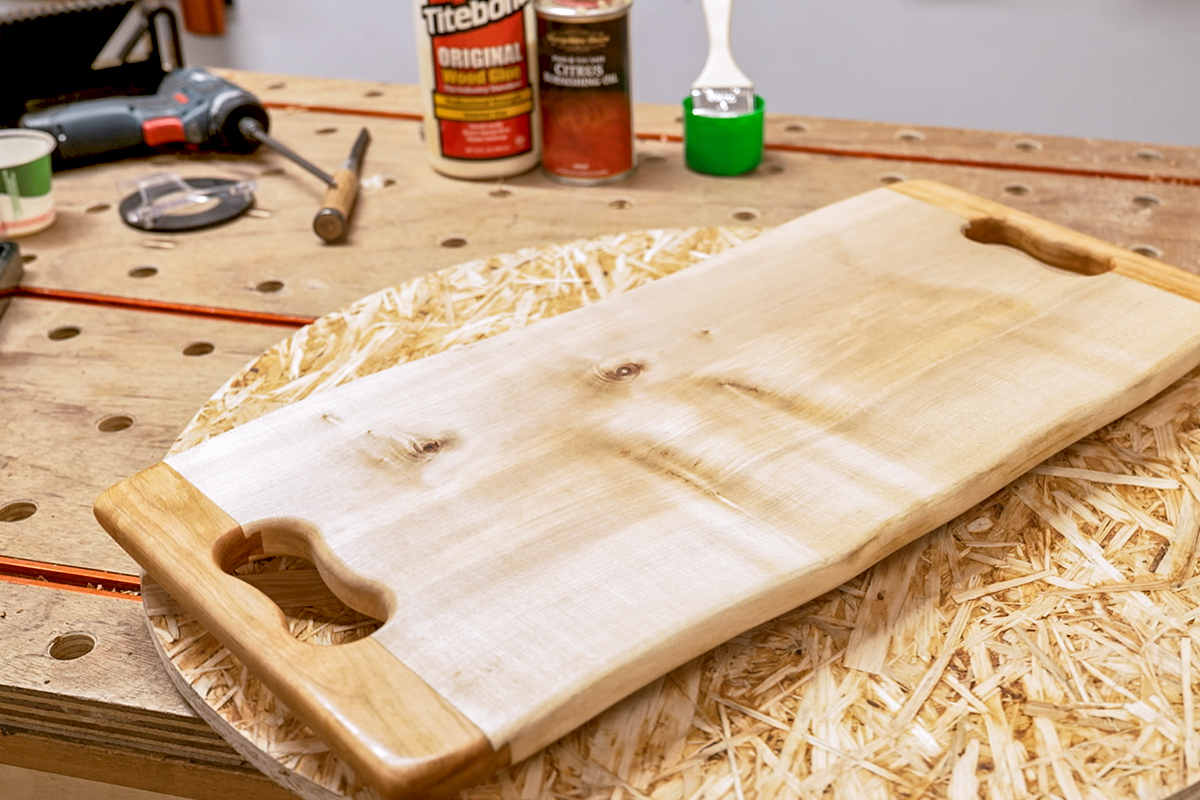
Dovetail Serving Tray | How To
What you'll need
This serving tray project is a great way to practice a dovetail joint and adding some extra detail and strength to this attractive platter or chopping board.
Using contrasting timbers will make the dovetail ends stand out and create beautiful detail but also helps ensure the board stays flat. Using a dovetail is also stronger than gluing.
You can use dry, split free timber for this project. Quarter sawn timber will help keep it flat.
Adapt the sizes to suit what you require.
Watch Jason in our Woodworking Wisdom demo or follow our step by step guide below.
Prepare your timber
Machine the board and handle material using a planer thicknesser or a hand plane to get this flat. Thickness to about 22mm. The handle material is easier to machine as one piece and then cut in two pieces once the dovetails have been machined.
Cut the end straight with a mitre saw or bandsaw. You can also use a shooting board to ensure this is straight and flat.


Machine the dovetail
Machine the dovetail in the main board. Use a slot cutter to remove the bulk waste, then change the cutter to the dovetail. A batten clamped to the board that runs on the top of the fence will help keep the board flat and adds more control. The dovetail cutter should just clear the bottom of the slot cutter cut.


To create the dovetail on the handle, use the same dovetail cutter and the same height as on the board. Set the fence up so that a light cut is taken on either side of the handle material and move the fence back to remove more material. Patience is required for this and the aim is to get this to fit firmly with no gap. The handle should slide in with a little force.


Mark and cut the handle holes
With the handle positioned on the main board, mark out the cut-out holes. Drill the holes using a pillar drill and a 40mm Forstner bit. Top tip: Masking tape on the underside will help reduce the breakout.
With the holes drilled, mark out the rest of the handle shape. Next, remove the handle sections from the board using a band saw or jigsaw. Cut out the small sections between the holes.


Drill and fit the handle
Drill the plugs and screw holes in the outer faces of the handle. Use a matched size set of 10mm plug and cutters and drill the screw holes all the way through the handle with a 5mm drill to allow the screws to fit through easily. The plugs to fill the drilled holes for the screws are drilled on the very end of the handle material.
Fit the handle in place and glue to secure. Using a washer head type screw, glue the plugs in and cut off the excess.


Shape the external of the board using the bandsaw then use a round over router cutter to shape the handle holes and outer edges of the board.


Finish the serving tray
Sand the edges and the board. Use a small bobbin sander in a cordless drill to clean up the handle holes.
Finish with a food safe oil.


Made it? Share it!
If you have felt inspired by this serving board project and have had a go, we would love to see your pics! Take a picture, and share it with us on social media. Search and tag @axminstertools on Facebook and Instagram or upload to our online gallery.