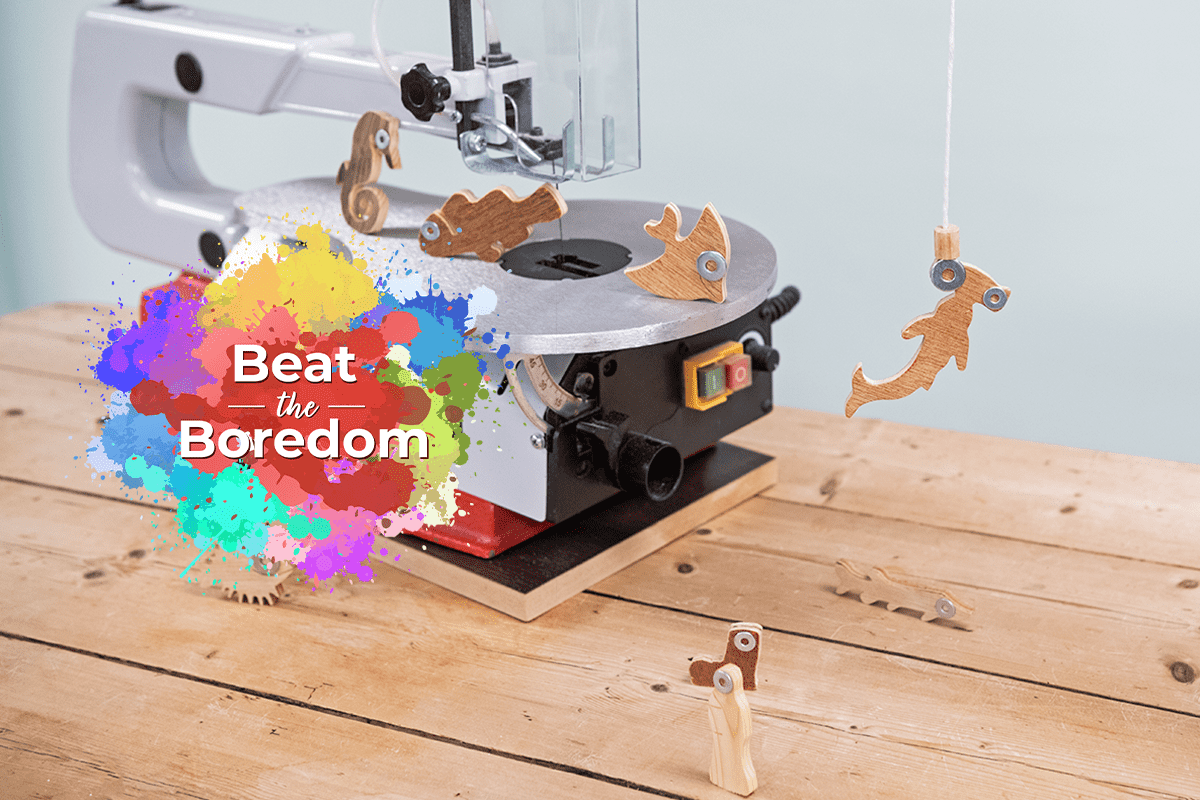
Fishing Game
Why not tackle our latest Beat The Boredom ‘How To’ project and have some fun? The perfect educational toy for a child, our fishing game is designed for children of all ages under strict adult supervision. This is due to the use of magnets and small washers which carry a choking hazard. This project is not suitable for children under three years of age.
Part 1 - Glue down and draw around template
You have two options here. You can either glue the template straight onto your pieces of timber using a wood glue/rubber type glue such as Copydex. Alternatively, cut out your template using scissors and draw around, or transfer using carbon paper. In our example, we used offcuts of ply and a piece of leftover pine cladding. We think using different thicknesses of material and different colours adds a bit of interest to the fish.
Part 2 - Cut out
Next, set the height of the hold down foot and guarding just above the workpiece. Carefully cut around the outline of the fish, not forgetting the mouth detail and any details on the fins or elsewhere. Adjust the hold down foot depending on the thickness of the material. Once you have cut all of the shapes out, tidy up any rough edges with a piece of abrasive cloth/paper.
Part 3 - Glue the washer eyes
The next step is to glue on the washer eyes using a medium superglue type glue. Here, you'll only need to use a spot of glue where the washer will be placed. Don't forget to use gloves when applying superglue; it can be messy!
Part 4 - Make the fishing rod
Cut a piece of dowel to your desired length (400mm pictured) and then sand away any rough bits. The piece of string that will be the fishing line needs to be roughly twice the length of the dowel. This is because it will wrap around the dowel to form the handle. Next, glue the string to the dowel and allow to dry for a couple of minutes. Wrap the string around the bit you have just glued and continue until you have a handle or grip. Finally, add another spot of superglue to hold it in place.
Once dry, screw in the eyelets. For the placement, we recommend one by the handle, one at the end and one in the middle. To give yourself a head start, use a drawing pin to make an indent. This helps as screwing in the eyelets can be a bit tricky. Lastly, thread the piece of string through the eyelets.
Part 5 - Make the magnetic hook
Next, cut another piece of dowel roughly 20mm long. Hold this in a vice and drill all the way through with a 3mm drill bit. At this stage, you can use any vice, be it a drill press vice or a bench vice. For the magnet, use an 8mm countersunk, as per our example. Using an 8mm drill bit (centre on the 3mm hole), drill a recess for the magnet to sit in 3-4mm deep.
Thread the string through both the drilled dowel and magnet with the countersink facing out. Tie a knot in your string and add a spot of superglue to harden it. Once the superglue is dry, trim it to fit into the countersink.
Part 6 - Test and oil
The final step of the fishing game project is to test the magnet. You need to make sure the magnetic picks up the fish and other underwater creatures for guaranteed fun. Please note you may need to trim the knot on the string. Once you are happy, you can finish this project however you like. In our example, we used a food safe oil but why not add some colour with some felt tip pens or paint? The choice is yours!
Win a £25 Gift Card…
For a chance of winning at £25 Axminster Gift Card, simply show us what Beat The Boredom projects you’ve completed by uploading them to Instagram, Facebook or on to our Community Forum.
Snap It
Take a photo of your project.
Tag It
Use the #BeatTheBoredom hashtag and upload it to one of the following;
Discover more…
If you’ve enjoyed reading this article, keep an eye out for our next woodworking project for kids as part of our Beat The Boredom series. Watch this space for more details! Furthermore, why not take a look at all of our previous projects below?
Stuck at home with the kids? Looking for something fun to do? We have the answer with our online Beat the Boredom Series. A great way to get the children involved in a variety of...
Get connected!
Follow us on Instagram and Facebook to stay up to date on all the latest from our Beat the Boredom series. Connect with us using #BeatTheBoredom to @AxminsterTools.


A job for this weekend, thank you!!
Looks look like a great idea and a fun project. It would be great if there was a download pdf option too to take into the workshop/garage :-)